Now I have found the Gunny to be like a lot of Senior Non Commissioned Officers that I served with in the Army. All of them are the real crown jewels of the military.
As they are the folks who get things done. God Bless them all!
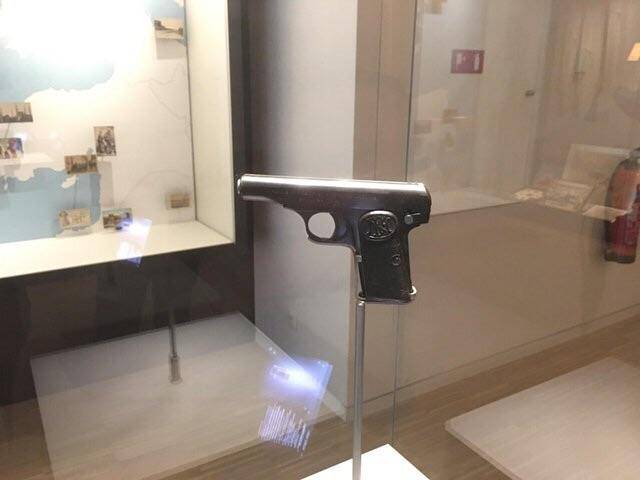
This pistol is the one that was used to Kill the Archduke Ferdinand of the Austrian-Hungarian Empire & his wife in 1914.
This event in turn became the source of the First World War. Or as I call it, Europe’s first serious attempt at Suicide.
This what the Old boy looked like before he got shot. All by accounts he was a pretty decent guy.
This is what the punk / terrorist / freedom Fighter that pulled the Trigger looked like. He died in a Austrian prison from disease during the war.
So indirectly this nondescript looking semi automatic pistol. Is the root cause of the death of about 16 million. Also the First World War led in turn to WWII and the death of another 60 million. Give or take.
Literally a Blast from the past!
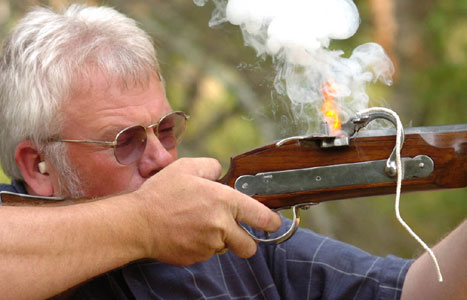
I sure would not want to get hit by one of these soft lead musket balls!
Back back in the really / terrible old days of say the 1450’s to say the 1570’s Europe or Japan. Folks did not have the kind of firearms that we do not have today.
But this does not mean that they were stupid or anything even close to it. Now having discovered Gunpowder and what it can do. Thanks to the Chinese!
The ruling Class quickly began to invest on how to use it in their arguments with each other and the peasantry*. (*For most folks today that would of been us)
So the bright boys of the realm began to collectively to put their brains on this problem.
Here is what they came up with!
The Matchlock Musket
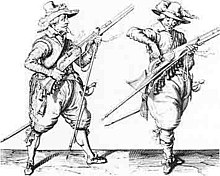
Okay here is what it is. Surprisingly enough. The have the basic form of today’s rifles. With a Lock to ignite the powder. The Stock to hold it up and aim with. Then the barrel to place the ammunition and help guide it toward its target.
As you no doubt have guess it already. This is a muzzle loading weapon and is a very slow and inaccurate weapon. But it was miles ahead of anything else out there at the time.
The major problems were the poor quality of gunpowder available, that you have a slow burning sulphur soaked cord near a lot of gunpowder. That and poorly bored barrels that cut down the musketeers accuracy.
Also the weather can really mess with the match. That and you could literally see the enemy coming from all the smoke.
So here is a video about how to load this puppy. Sorry its in French. But you will get the general idea about how slow reloading is.
Also if you really want to get a good taste of this era. You might also want to get the DVD of the 3 & 4 Musketeers that was made in 1974. Here is a little peek enjoy!
You also might like this one too.
Here is some more & probably better written information about the Matchlock
From Wikipedia, the free encyclopedia
The matchlock was the first mechanism, or “lock”, invented to facilitate the firing of a hand-held firearm. Before this, firearms (like the hand cannon) had to be fired by applying a lit match (or equivalent) to the priming powder in the flash pan by hand; this had to be done carefully, taking most of the soldier’s concentration at the moment of firing, or in some cases required a second soldier to fire the weapon while the first held the weapon steady. Adding a matchlock made the firing action simple and reliable by a single soldier, allowing him to keep both hands steadying the gun and eyes on the target while firing.
The classic European matchlock gun held a burning slow match in a clamp at the end of a small curved lever known as the serpentine. Upon the pulling of a lever (or in later models a trigger) protruding from the bottom of the gun and connected to the serpentine, the clamp dropped down, lowering the smoldering match into the flash pan and igniting the priming powder. The flash from the primer travelled through the touch hole igniting the main charge of propellant in the gun barrel. On release of the lever or trigger, the spring-loaded serpentine would move in reverse to clear the pan. For obvious safety reasons the match would be removed before reloading of the gun. Both ends of the match were usually kept alight in case one end should be accidentally extinguished.
Earlier types had only an “S”-shaped serpentine pinned to the stock either behind or in front of the flash pan (the so-called “serpentine lock”), one end of which was manipulated to bring the match into the pan.[1][2]
Most matchlock mechanisms mounted the serpentine forward of the flash pan. The serpentine dipped backward, toward the firer, to ignite the priming. This is the reverse of the familiar forward-dipping hammer of the flintlock and later firearms.
A later addition to the gun was the rifled barrel. This made the gun much more accurate at longer distances but did have drawbacks, the main one being that it took much longer to reload because the bullet had to be pounded down into the barrel.[3]
A type of matchlock was developed called the snap matchlock,[4] in which the serpentine was held in firing position by a weak spring,[5] and released by pressing a button, pulling a trigger, or even pulling a short string passing into the mechanism. As the match was often extinguished after its relatively violent collision with the flash pan, this type fell out of favour with soldiers, but was often used in fine target weapons.
Various Japanese (samurai) Edo period matchlocks (tanegashima).
An inherent weakness of the matchlock was the necessity of keeping the match constantly lit. The match was steeped in potassium nitrate to keep the match lit for extended periods of time.[3] Being the sole source of ignition for the powder, if the match was not lit when the gun needed to be fired, the mechanism was useless, and the weapon became little more than an expensive club. This was chiefly a problem in wet weather, when damp match cord was difficult to light and to keep burning. Another drawback was the burning match itself. At night, the match would glow in the darkness, possibly revealing the carrier’s position. The distinctive smell of burning match-cord was also a giveaway of a musketeer’s position (this was used as a plot device by Akira Kurosawa in his movie Seven Samurai). It was also quite dangerous when soldiers were carelessly handling large quantities of gunpowder (for example, while refilling their powder horns) with lit matches present. This was one reason why soldiers in charge of transporting and guarding ammunition were amongst the first to be issued self-igniting guns like the wheellock and snaphance.
The matchlock was also uneconomical to keep ready for long periods of time. To maintain a single sentry on night guard duty with a matchlock, keeping both ends of his match lit, required a mile of match per year.[6]
Japanese foot soldiers (ashigaru) firing tanegashima (matchlocks)
The Janissary corps of the Ottoman army were using matchlock arms from the 1440s onwards.[7] Improved versions of the arquebus were transported to India by Babur in 1526.[8][9]
The matchlock appeared in Europe in the mid-15th century (the matchlock was obsolete around 1700 in Europe),[10] with the idea of a serpentine appearing in an Austrian manuscript. The first dated illustration of a matchlock mechanism dates to 1475 (making it the first firearm with a trigger[11]) and by the 16th century they were universally used. During this time the latest tactic in using the matchlock was to line up and send off a volley of musket balls at the enemy. This volley would be much more effective than single soldiers trying to hit individual targets.[3] China is credited with inventing both gunpowder and firearms but the matchlock was claimed to have been introduced to China by the Portuguese. Europeans refined the hand cannons that had arrived in Europe in the early 15th century and added the matchlock mechanism. The Chinese obtained the matchlock arquebus technology from the Portuguese in the 16th century and matchlock firearms were used by the Chinese into the 19th century.[12] The Chinese used the term “bird-gun” to refer to muskets and Turkish muskets may have reached China before Portuguese ones.[13]
In Japan the first documented introduction of the matchlock which became known as the tanegashima was through the Portuguese in 1543.[14] The tanegashimaseems to have been based on snap matchlocks that were produced in the armory of Goa in Portuguese India, which was captured by the Portuguese in 1510.[15]While the Japanese were technically able to produce tempered steel (e.g. sword blades), they preferred to use work-hardened brass springs in their matchlocks. The name tanegashima came from the island where a Chinese junk with Portuguese adventurers on board was driven to anchor by a storm. The lord of the Japanese island Tanegashima Tokitaka (1528–1579) purchased two matchlock rifles from the Portuguese and put a sword smith to work copying the matchlock barrel and firing mechanism. Within a few years the use of the tanegashima in battle forever changed the way war was fought in Japan.[16]
Despite the appearance of more advanced ignition systems such as that of the wheellock and the snaphance, the low cost of production, simplicity, and high availability of the matchlock kept it in use in European armies until about 1720. It was eventually completely replaced by the flintlock as the foot soldier’s main armament.
There is evidence that matchlock rifles may have been in usage among some peoples in Christian Abyssinia in the late Middle Ages. Although modern rifles were imported into Ethiopia during the 19th century, contemporary British historians noted that along with slingshots the elderly used matchlock rifle weapons for self-defense and by the militaries of the Ras.[17][18]
In Taiwan under Qing rule the Hakka on Taiwan owned matchlock muskets. Han people traded and sold matchlock muskets to the Taiwanese aborigines. During the Sino-French War the Hakka and Aboriginals used their matchlock muskets against the French in the Keelung Campaign and Battle of Tamsui.
The Hakka used their matchlock muskets to resist the Japanese invasion of Taiwan (1895) and Han Taiwanese and Aboriginals conducted an insurgency against Japanese rule.
Tibetan nomad fighters used arquebuses for warfare during the Chinese invasion of Tibet as late as the second half of the 20th century. Tibetan nomads still use matchlock rifles to hunt wolves and other predatory animals. These matchlock arquebuses typically feature a long, sharpened retractable forked stand and are part of Tibetan traditional Nomad regalia. Some of these arquebuses are engraved with silver and gold inlays and/or have damascened barrels. Early 20th century explorer Sven Hedin also encountered Tibetan tribesmen on horseback armed with matchlock rifles along the Tibetan border with Xinjiang.
Now I am sure that some of you folks out there are thinking of some of the clunkers we have all seen out there.
Like this poor puppy. (Sorry if this is your rifle It’s nothing personal)
Now granted that some of us are not really flush with cash. Hey! I get it as I have been there & done that.
So I shall not inflict upon you some of the horrors that I have bought and shot.
Now here is what I figured out a few years ago. As since todays the prices for your basic rifle is frankly just ridiculous. Just take a look one of these days at this!
Granted that steel is a lot more expensive and so is the other things needed to build a gun. Plus the folks involved need to ate. So I accept that. As this is just the way the world is now.
For Example this should give one a clue.
So here is what I do. I generally make a circuit of the local gun shops.
The reason why is two fold.
In that the Owners learn to know me and what I like. Also to see what is up for sale and what the general prices are.
I also try hard to go to the local gun shows. Where it’s hard to concentrate due to the usual sensory overload of the place.
As there usually someone wanting to sell dear old (who ever) departed guns.
What to look for in buying one.
Now I am a sucker for good wood stocks.
If the rifle has it. Then usually it means somebody has put a lot of love and effort into this piece. I can overlook the usually dings caused by use in the field if they are not too bad.
Also if the lines of the rifle looks good is another good sign. That & if no serious signs of abuse is a good thing.
(Yes I like thumb holes. Since they work for me!)
If you have followed me this far. Then ask nicely to pick it up and check it out. Manners by the way are very important in a gun show. Remember that a lot of folks are armed here. (An Armed Society is a Polite Society)
Usually the Show will have the gun in a inoperative manner by a plastic ban put on by the staff. If you are really interested ask to have it taken of. Then check the action and the internal condition.
One must also consider the caliber of the gun. Especially considering the availability and price of it. I bought a Winchester 43 in 218 Bee really cheap.
But then found out how hard it and expensive the ammo was. By the by, it was very accurate but finding ammo was too much effort. So I sadly sold it for a handsome profit.
Models that I have the most luck with
Mauser 98’s – I have about a dozen of these in various calibers. From 22-250 thru 30-06 and each of them are great additions to my humble collection.
(I wish that I owned this one)
1903 Springfield- I think that I am on very safe ground here. A the Famous Griffin & Howe use to make a lot of rifles from the action of the 03’s for the great and famous. Teddy Roosevelt took one on his African Safari.
(This one became TR’s Son Kermit’s 1903)
My stance on this is that if its good enough for him. I think that I would be a fool not to have a couple also one time or another. In 22-250, 243 Win, 25-06, 308. 35 Whelen and of course 30-06.
Like this one (Not Mine either but it comes close)
1917 Enfield
As it use to be before we became a major Arms Dealer. Our country was always under equipped when it came to our military. This was true in WWI or as some called it. The War to end all wars. Please stop laughing as I am not kidding! They actually thought that until Hitler & **TRIGGER WARNING** The Japs showed up
So what we did was to take the Enfield rifles that we were making for the **TRIGGER WARNING*** British Empire.
Where upon the US Army just changed the caliber to 30-06. The amazing thing was that it was the primary battle rifle for the Dough boys. After the war serious thought was made of making it the primary rifle for the peacetime Army. But the forces backing the 1903 prevailed instead.
Now the good news for you & I. This was one of the strongest actions ever made by Winchester and Remington. So eventually a lot of them were converted to various Dangerous Game Calibers. I.E. 300 H&H , 300 Win Mag and even up to 458 Win Magnum. **TRIGGER WARNING*** (I owned a 458 a long time ago and turned a squirrel into pink mist once with it.)
Another interesting item about them. Was that I was told by a gunsmith that the barrels were screwed in with the pressure of one ton. So that the only way to re-barrel one is to carefully cut off the GI barrel. I was also told a lot of foolish folks got hurt by this over time.
None the less it is a very solid if not ugly looking rifle. That can still really shoot well if it has been taken care of over the years. They are also usually very priced to sell also.
Martini Cadet
Once upon a time. I was over in Phoenix as the Wife is a rabid Chicago Cubs fan. So while she is at the Spring Training games. I get to check out the local gun shops.
While doing so I spied a very strange looking rifle . It turning out to be a Martini Cadet Rifle that had be done over as a very heavy 22 LR Target / Bench Rest Rifle.
Looking like this one.
Now I have been a huge fan of the Movie Zulu since I was a young snot. I was very intrigued by it. Needless to say I paid a huge price for it. (The Son & Heir thought that I had finally & totally lost it.)
But when it finally got home to the Peoples Republic and on the range. Where upon it turned out to be a tack driver of a rifle. So as the Aussies would say “Keep Her!”
Some day I am going to build me a another one in 357 Magnum. But right now I am vastly too broke to proceed.
As a side note. Back in the Old Queens day.
Some body had the really bright idea to reduce the Martini Henry Rifle to a smaller 22 caliber rifle . To be used as a training rifle out in the ***Trigger Warning*** White Colonies. So as to help train the youngsters in rifle marksmanship.
I could not even think of having a youngster shhot the fear some old 577/450 round. Since it kicks like a mule!
It was also then a hell of a lot cheaper to too as 22 LR back then was dirt cheap. Compared to the standard 577/450 Martini Henry round.
Here is a small a scene from the Movie Zulu. Hopefully you will enjoy it as much as I do.
Emergency : Snake bite , what to do and what not to do
Snakes can be friendly
First Aid & Treatment
Snake venom is actually a kind of highly evolved salivary secretion which is used to both kill and digest prey. Venom was not made against man. There are two basic types of snake venom. One affects the nerves (venom of cobra and common krait); the other one blood (that of vipers). Polyvalent anti-venom serum is effective against the bites of the Big Four – cobra, saw-scaled viper, common krait, Russell’s viper. If a venomous snake bites someone, just remember two things: don’t panic; go to a hospital and get anti-venom serum.
Keep the victim calm, restrict movement.
Assure the victim and do not let him panic. When under panic, it will enhance heart rate and would circulate the venom faster in the body.
Remove any rings or constricting items; the affected area may swell.
Stop lymphatic spread of venom – bandage firmly, splint and immobilise. The limb, which has been affected by the bite, should be immobilized with splint. Victim to keep the hand as close to the level of the heart as possible – this reduces the flow of venom to major areas. A compression bandage (as firm as you would put on a sprained ankle) should cover the entire limb with the splint. The wrapping should start from the digits and extend till armpit in case of hands and groin in case of bite to the leg.
A snakebite victim is under tremendous psychological stress. It is necessary to keep the patient warm. However, no alcohol/hot beverages should be given.
The patient should not be allowed to exert himself in any manner. Do not allow the victim to eat or to drink water in order to keep metabolism at low rate. No water No food is the golden rule.
DO NOT COVER THE BITE AREA AND PUNCTURE MARKS. The wound should be gently cleaned with antiseptic.
Try to aspirate the venom out of the puncture marks with standard suction devices. It has been identified that a suction more than 270 mmHg can initiate the flow from the puncture marks. Suction instruments often are included in commercial snakebite kits. But, the suction should be applied within 5 minutes of the bite.
The only remedy for venomous snakebite is the anti-venom serum, which is available at most government hospitals and public health centers. Some private nursing homes have also started stocking it and treat snakebite cases.
How NOT to Treat Snakebite
No ice or any other type of cooling action on the bite. Research has shown it to be potentially harmful.
No electric cable, string or rubber tourniquets to be used, this cuts off blood flow completely and may result in amputation of the affected limb.
No electric shock, this method is under study and has yet to be proven effective. It could harm the victim.
No incision in the bite site. Such measures have NOT been proven useful and causes needless additional injury, loss of blood, infection, waste of time.
Do not burn the wound, as it would not have any effect on the venom, which has already entered the bloodstream.
Do not suck the wound with mouth. A suction device may be applied over the bite to help draw venom out of wound without making cuts.
Potassium permanganate should never be used.
Know About Snakebite
All snakes are not venomous – so every snakebite is not going to result in death – it would save people from quacks. And reduce the amount of panic and chaos.
Even a venomous bite is not always fatal – because the severity of snakebite depends on many factors like the size of the snake, whether the bite could be completed, whether it was a drybite or not, the age, physique and affected limb of the victim.
First Aid would enable a person to buy more time to reach medical aid on time.
The only cure which is available is anti-venom serum injection and not quacks.
First Aid – if not done properly could cause more harm than benefit.
How to Prevent a Snake Bite
Any unknown snake is potentially dangerous; do not play, avoid any contact with any snake including those of small size, baby, lethargic, dead. A cut off head can keep poisonous activities for several minutes. Make yourself familiar with the description of poisonous snakes in the place where you live.
Use torchlight at night – all local poisonous snakes are active in the evening and at night. Pay more attention in the forest, close to bushes, tall plants, etc.
Snakes usually don’t bite you without alarm:
Cobra – lifts vertically front part of the body (1/3), opens hood, makes hiss, rushes to the aim.
Vipers – make a spiral from a tail, bend like zigzag front part of the body, and make a strong hiss.
If you meet a snake, go back slowly, don’t do sudden movements, do not turn your back to the snake, do not run, and give the possibility for a snake to go away
Remember
Never try to assess whether it was venomous snakebite or not. As a layman one should treat every snakebite as venomous snakebite, as some snake venom (like that of common krait) does not show immediate effect even in the case of a serious bite, it is wise to rush to a hospital.
Not all bites from venomous snakes lead to death; many venomous snakes (and as many as 85% of snakes are non venomous) deliver only a dry bite to humans. Even in the case of a full bite, with appropriate first-aid, care and treatment a snakbite victim can fully recover. Very few venomous snakebites are fatal. Just as every mosquito bite does not cause malaria, so every snakebite does not cause death.
No attempt should be made to kill the snake to carry it along to the hospital. It would result in delaying the arrival of the patient to the hospital and is potentially dangerous for the person who will attempt killing the snake. Qualified doctor can diagnose observing the patient for clinical symptoms and pathologial tests.
Basic first aid refers to the initial process of assessing and addressing the needs of someone who has been injured or is in physiological distress due to choking, a heart attack, allergic reactions, drugs or other medical emergencies. Basic first aid allows you to quickly determine a person’s physical condition and the correct course of treatment. You should always seek professional medical help as soon as you are able, but following correct first aid procedures can be the difference between life and death. Follow our entire tutorial, or find specific advice by checking out the sections listed above.
1
Performing the Three Cs
1
Check the surroundings. Evaluate the situation. Are there things that might put you at risk of harm? Are you or the victim threatened by fire, toxic smoke or gasses, an unstable building, live electrical wires or other dangerous scenario? Do not rush into a situation where you could end up as a victim yourself. This refers to the D (Danger) in DRABC (Danger, Response, Airways, Breathing and Circulation).[1]
If approaching the victim will endanger your life, seek professional help immediately; they have higher levels of training and know how to handle these situations. First aid becomes useless if you can’t safely perform it without hurting yourself.
2
Call for help. Call out for help 3 times before you begin assisting the casualty. If someone is with you or approaches, instruct them to call the authorities and be prepared to relay information to them so they can update the responders. It is not recommended that you leave the casualty unless absolutely required, but put them in the recovery position if you need to leave them for any reason.[2]
3
Care for the person. Caring for someone who has just gone through serious trauma includes both physical treatment and emotional support. Remember to stay calm and try to be reassuring; let the person know that help is on its way and that everything will be alright. Other ways to reassure the casualty include asking for their name, if they know what has happened, and then about their interests.
2
Caring for an Unconscious Person
1
Determine responsiveness. If a person is unconscious, try to rouse them by speaking to them; do not be afraid to speak up. If they do not respond to activity, sound, touch, or other stimulation, determine whether they are breathing.
2
Check for breathing and a pulse.[3] If unconscious and unable to be roused, check for breathing: look for a rise in the chest area; listen for the sound of air coming in and out; feel for air using the side of your face. If no signs of breathing are apparent, place two fingers under the chin and gently guide the face pointing upwards to open up their airways. If any debris such as vomit can be seen, it is appropriate to move them onto their side to allow it to get out, which is achieved with the recovery position.[4] Check for a pulse.
3
If the person remains unresponsive, prep for CPR. Unless you suspect a spinal injury, carefully roll them onto their back and open their airway.[5] If you suspect a spinal injury, leave the person where they are, provided they are breathing.[6]
Keep the head and neck aligned.
Carefully roll them onto their back while holding their head.
Open the airway by lifting the chin.
4
Perform 30 chest compressions and two rescue breaths as part of CPR. In the center of the chest, just below an imaginary line running between the nipples, put your two hands together and compress the chest down approximately 2 inches (5.1 cm) at a rate of 100 compressions per minute (or to the beat of “Staying Alive”). After 30 compressions, give two rescue breaths, done by opening the airways, closing the nose and fully covering the mouth hole. Then check vitals. If the breaths are blocked, reposition the airway. Make sure the head is tilted slightly back and the tongue is not obstructing it. Continue this cycle of 30 chest compressions and two rescue breaths until someone else relieves you.[7]
5
Remember your ABCs of CPR. The ABCs of CPR refer to the three critical things you need to look for.[5]Check these three things frequently as you give the person first aid CPR.
Airway. Does the person have an unobstructed airway?
Breathing. Is the person breathing?
Circulation. Does the person show a pulse at major pulse points (wrist, carotid artery, groin)?
6
Make sure the person is warm as you wait for medical help. Drape a towel or a blanket over the person if you have one; if you don’t, remove some of your own clothing (such as your coat or jacket) and use it as a cover until medical help arrives. However, if the person has a heatstroke, do not cover him or keep him warm. Instead try to cool him by fanning him and damping him.
7
Pay attention to a list of don’ts. As you administer first aid, be sure to be aware of these things that you should not do in any case:
Do not feed or hydrate an unconscious person. This could cause choking and possible asphyxiation.
Do not leave the person alone. Unless you absolutely need to signal or call for help, stay with the person at all times.
Do not prop up an unconscious person’s head with a pillow.
Do not slap or splash with water an unconscious person’s face. These are movie gimmicks.
If the person appears in danger due to an electric shock, you may attempt to move it, but only with a non-conductive object.
3
Treating Common Problems In First Aid Scenarios
1
Protect yourself from bloodborne pathogens. Bloodborne pathogens can threaten your health and wellbeing by causing sickness and disease. If you have a first aid kit, sanitize your hands and put on sterile gloves. If sterile gloves and sanitizer are not available, protect your hands with extra gauze or cotton. Avoid direct contact with the other person’s blood. If you do end up making contact, make sure to clean yourself off as soon as possible. Eliminate any remaining sources of contamination.
2
Stop the bleeding first. After you have established that the victim is breathing and has a pulse, your next priority should be to control any bleeding. Control of bleeding is one of the most important things you can do to save a trauma victim. Use direct pressure on a wound before trying any other method of managing bleeding. Read the linked article for more detailed steps you can take.
Treat a bullet wound. Bullet wounds are serious and unpredictable. Read on for special considerations when treating someone who has suffered a gunshot wound.
3
Treat shock next. Shock, often caused a loss of blood flow to the body, frequently follows physical and occasionally psychological trauma. A person in shock will frequently have cool, clammy skin, be agitated or have an altered mental status, and have pale color to the skin around the face and lips. Untreated, shock can be fatal. Anyone who has suffered a severe injury or life-threatening situation is at risk for shock.
Immobilize the area. Make sure that the broken bone doesn’t have to move or support any other body parts.
Numb the pain. Often, this can be done with an ice-pack covered by a towel.
Make a splint. A bundle of newspapers and sturdy tape will do just the trick. A broken finger, for example, can also use another finger as a stabilizing splint.
Make a sling, if necessary. Tie a shirt or a pillowcase around a broken arm and then around the shoulder.
5
Help a choking victim. Choking can cause death or permanent brain damage within minutes. Read this article for ways to help a choking victim. The article addresses helping both children and adult choking victims.
One of the ways to help a choking victim is the Heimlich maneuver. The Heimlich maneuver is performed by straddling the victim from behind and bear-hugging them with your hands interlocked above their belly-button but beneath their breastbone. Thrust upward to expel air from the lungs and repeat until you are successful in clearing the object from the windpipe. IF THIS WORKS, THE PERSON WILL NEED TO VISIT THE HOSPITAL QUICKLY, INTERNAL BLEEDING CAN BE CAUSED WITH THIS METHOD.
6
Learn how to treat a burn. Treat first- and second-degree burns by immersing or flushing with cool water for at least 10 minutes (no ice). Don’t use creams, butter or other ointments, and do not pop blisters. Third degree burns should be covered with a damp cloth. Remove clothing and jewelry from the burn, but do not try to remove charred clothing that is stuck to burns.
7
Look out for a concussion. If the victim has suffered a blow to the head, look for signs of concussion. Common symptoms include:
Loss of consciousness following the injury
Disorientation or memory impairment
Vertigo
Nausea
Lethargy.
8
Treat a Spinal Injury Victim. If you suspect a spinal injury, it is especially critical that you not move the victim’s head, neck or back unless they are in immediate danger. You also need to take special care when performing rescue breathing or CPR. Read this article to learn what to do.
4
Treating Rarer Cases in First Aid Scenarios
1
Help someone who is having a seizure. Seizures can be scary things for people who’ve never experienced them before. Luckily, helping people with seizures is relatively straightforward.
Clear the surroundings to protect the person from hurting themselves.[8]
Activate emergency medical services if the seizure lasts more than 5 minutes or if the person is not breathing afterwards.
After the episode has ended, help them to the floor and put something soft or flat under their head. Turn them onto their side to ease breathing, but do not hold the person down or try to stop their movements.
Be friendly and reassuring as their consciousness returns and do not offer food or water until fully alert.
2
Help someone survive a heart attack. It helps to know the symptoms of heart attack, which include rapid heartbeat, pressure or pain in the chest, and general unease or nausea. Rush the person to the hospital immediately while giving them an aspirin or a nitroglycerin, which the person should chew.
3
Identify someone having a stroke. Again, knowing the symptoms of stroke is important. They include temporary inability to talk or understand what is being said; confusion; loss of balance or dizziness; and severe headache with no precursor, among others. Rush a person you suspect has had a stroke to the emergency room immediately.
4
Treat poisoning. Poisoning can occur as a result of natural toxins (i.e. snake bite) or chemical combinations. If an animal may be responsible for poisoning, try to (safely) kill it, bag it, and bring it with you to poison control.
I found this on the Net. It seems to have some pretty solid advice to me at least.
That & I just want to wish all the Folks that are in Harms way right now, all the Best!
The safe way to deal with a flood? Go somewhere else. Stay somewhere else. And be absolutely safe when returning to a flood zone.
Here’s our best advice on how to do that:
BEFORE A FLOOD (WHEN FLOODING IS FORECAST)
Be alert.
Monitor your surroundings.
Monitor NOAA Weather Radio, local television and radio stations, or go to www.weather.gov.
If a flash flood warning is issued for your area: Climb to safety immediately.
Flash floods develop quickly. Do not wait until you see rising water.
Get out of low areas subject to flooding.
If driving, do not drive through flooded roadways!
Assemble disaster supplies:
Drinking water – Fill clean containers.
Food that requires no refrigeration or cooking.
Cash.
Medications and first aid supplies.
Clothing, toiletries.
Battery-powered radio.
Flashlights.
Extra batteries.
Important documents: insurance papers, medical records, bank account numbers.
Be prepared to evacuate.
Identify places to go.
Identify alternative travel routes that are not prone to flooding.
Plan what to do with your pets.
Fill your car’s gas tank.
If told to leave, do so quickly.
Review your Family Disaster Plan.
Discuss flood plans with your family.
Decide where you will meet if separated.
Designate a contact person who can be reached if family members get separated. Make sure every family member has the contact information.
Protect your property.
Move valuables and furniture to higher levels.
Move hazardous materials (such as paint, oil, pesticides, and cleaning supplies) to higher locations.
Disconnect electrical appliances. Do not touch them if you are wet or standing in water.
Bring outside possessions indoors or tie them down securely. This includes lawn furniture, garbage cans, and other movable objects.
Seal vents to basements to prevent flooding.
DURING A FLOOD
Be alert.
Monitor your surroundings.
Monitor NOAA Weather Radio, local television and radio stations, or go to www.weather.gov.
Don’t drive unless you have to.
If you must drive, travel with care.
Make sure your vehicle has enough fuel.
Follow recommended routes. DO NOT sightsee.
Avoid disaster areas. Your presence might hamper rescue or other emergency operations and put you at further risk.
Watch for washed out roads, earth slides, and downed trees or power lines.
Be especially cautious at night, when it is harder to recognize flood dangers.
If the vehicle stalls, abandon it.
If water rises around your car, leave the vehicle immediately. Climb to higher ground as quickly as possible.
NEVER drive through flooded roadways. STOP! Turn Around Don’t Drown.
The roadbed may be washed out.
You can lose control of your vehicle in only a few inches of water.
Your car may float. Vehicles can be swept away by less than 2 feet of water.
Do not drive around a barricade. Turn around and go another way!
Get to high ground – Climb to safety!
Get out of low areas that may be subject to flooding.
Avoid already-flooded areas and do not attempt to cross flowing water.
Stay away from power lines and electrical wires.
Evacuate immediately, if you think you are at risk or are advised to do so!
Act quickly. Save yourself, not your belongings.
Move to a safe area before access is cut off by rising water.
Families should use only one vehicle to avoid getting separated and reduce traffic jams.
Shut off water, gas, and electrical services before leaving.
Secure your home: lock all doors and windows.
If directed to a specific location, go there.
Never try to walk or swim through flowing water.
If flowing water is above your ankles, STOP! Turn around and go another way.
If it is moving swiftly, water 6 inches deep can knock you off your feet.
Be aware that people have been swept away wading through flood waters.
NEVER allow children to play around high water, storm drains, creeks, or rivers.
Shut off the electricity at the circuit breakers.
If someone falls in or is trapped in flood water:
Do not go after the victim!
Use a floatation device. If possible throw the victim something to help them float, such as a spare tire, large ball, or foam ice chest.
Call 911. Call for assistance and give the correct location information.
AFTER A FLOOD
Wait until it is safe to return.
Monitor NOAA Weather Radio or local television and radio stations.
Do not return to flooded areas until authorities indicate it is safe to do so.
Do not visit disaster areas following a flood. Your presence may hamper urgent emergency response and rescue operations.
Travel with care.
Follow recommended routes. DO NOT sightsee.
Watch for washed out roads, earth slides, and downed trees or power lines.
Stay away from downed power lines.
If a building was flooded, check for safety before entering.
Do not enter a building if it is still flooded or surrounded by floodwater.
Check for structural damage. Inspect foundations for cracks or other damage.
Turn off any outside gas lines at the meter tank.
Do not enter a building that has flooded until local building officials have inspected it for safety.
Use extreme caution when entering buildings.
Wear sturdy shoes. The most common injury following a disaster is cut feet.
Use ONLY battery-powered lighting. Flammable material may be present.
Look for fire hazards (such as damaged gas lines, flooded electrical circuits, or submerged furnaces).
Check for gas leaks. If you smell gas or hear a blowing or hissing noise, open a window and quickly leave the building. If possible turn off the gas at the outside main valve. Call the gas company.
Report broken utility lines to appropriate authorities.
Check for electrical system damage (sparks, broken or frayed wires, or the smell of burning insulation). Turn off the electricity at the main circuit breaker if you can reach it without stepping in water.
Examine walls, floors, doors, windows, and ceilings for risk of collapsing.
Watch out for animals that might have entered with the floodwaters.
Let the building air out to remove foul odors or escaping gas.
Take pictures of the damage, both of the building and its contents, for insurance claims. Get professional help.
Seek necessary medical care. Do not neglect minor wounds or illnesses.
Food, clothing, shelter, and first aid are available from the American Red Cross.
If the gas has been turned off for any reason, it must be turned back on by a professional.
Have an electrician check the electrical system and appliances.
Wells should be pumped out and the water tested for purity before drinking.
Your home is no longer a safe place.
Throw away medicine, food, or water that had contact with floodwaters (including canned goods).
If water is of questionable purity, boil drinking water for 10 minutes.
Restrict children from playing in flooded areas.
Keep windows and doors open for ventilation.
Pump out flooded basements gradually (removing about 1/3 of the water volume each day) to avoid structural damage.
Keep the power off until an electrician has inspected the system for safety. All electrical equipment should be checked and dried before being returned to service.
Clean and disinfect everything that got wet.
Service damaged sewage systems as soon as possible.
When making repairs, protect your property from future flood damage.
Follow local building codes.
Use flood-resistant materials and techniques.
Elevate electrical components above the potential flood height.
Elevate utilities (washer, dryer, furnace, and water heater) above the level of anticipated flooding.
(Editor’s note:For our Texas readers who’ve survived Harvey and for our Florida readers now staring down the barrel of Irma, the NSSF and SAAMI put out some solid advice for those who may attempt to restore firearms or salvage ammo that has been exposed to water.)
Firearms owners who have seen their guns and stored ammunition submerged by flood waters in storm-wracked areas are probably wondering if their firearms and ammunition can be salvaged and safely used.
The Sporting Arms and Ammunition Manufacturers’ Institute® (SAAMI®) and National Shooting Sports Foundation® (NSSF®) point to two helpful documents containing guidelines to assist gun owners in making sound decisions related to safely handling and treating or disposing of these items, emphasizing to always err on the side of caution and safety.
SAAMI, founded in 1926, is an organization that creates and publishes industry standards on firearms and ammunition. NSSF is the trade association for the firearms and ammunition industry.
The SAAMI document “Guidance on Firearms That Have Been Submerged or Exposed to Extensive Amounts of Water” points out two major concerns about firearms that have been exposed to water: parts susceptible to moisture and rust damage such as metal parts, wood stocks and grips, and optics; and, secondly, infiltration of the action, barrel and safety systems by grit, silt and other foreign debris.
Always unload firearms before beginning any treatment process.
It’s important to limit moisture and corrosion damage to the component parts of the firearm. This can be accomplished by disassembling the component parts and using up to two coats of a moisture-displacing lubricant such as Hoppes #9 MDL or WD-40 to clean and stabilize the parts while, importantly, following the product’s directions so as not to damage, for instance, plastic or synthetic parts. Another tip is to allow wood stocks and grips to air-dry and not be force dried by exposure to heat.
The document emphasizes that once the firearm has been thoroughly dried, consideration must be given to having the firearm inspected and serviced by the manufacturer, an authorized service center, or a qualified gunsmith before putting the firearm back in service.
Dealing with Submerged Ammunition
To help firearms owners determine what to do with ammunition that has been affected by water and moisture, SAAMI offers another helpful document, “Guidance on Ammunition That Has Been Submerged in Water.”
Discussed are differences in moisture resistance between centerfire, rimfire and shotshell ammunition, and potential hazards associated with “drying out” cartridges, including possible deterioration and damage to cartridges due to drying methods.
Another serious hazard that could result from using compromised ammunition is the potential for a bore obstruction due to partial ignition of either the priming compound or the propellant powder charge, or both. Firing a subsequent round through an obstructed barrel can result in bodily injury, death and property damage.
SAAMI provides the following cautionary conclusion: “It would be impossible to ascertain for certain the extent of the deteriorating affect, if any, the water may have had on each individual cartridge. Therefore, the safe answer is that no attempt be made to salvage or use submerged ammunition. The ammunition should be disposed of in a safe and responsible manner. Contact your local law enforcement agency for disposal instructions in your area. Resources: Guidance on Ammunition That Has Been Submerged in Water Guidance on Firearms That Have Been Submerged or Exposed to Extensive Amounts of Water About NSSF The National Shooting Sports Foundation is the trade association for the firearms industry. Its mission is to promote, protect and preserve hunting and the shooting sports. Formed in 1961, NSSF has a membership of more than 12,000 manufacturers, distributors, firearms retailers, shooting ranges, sportsmen’s organizations and publishers. For more information, visit www.nssf.org.
I found this on the Web one day. So I thought I would share it you.
Sadly until I move out of the People’s Republic of California & back to America. I will not be able to follow thru on this myself.