


Categories


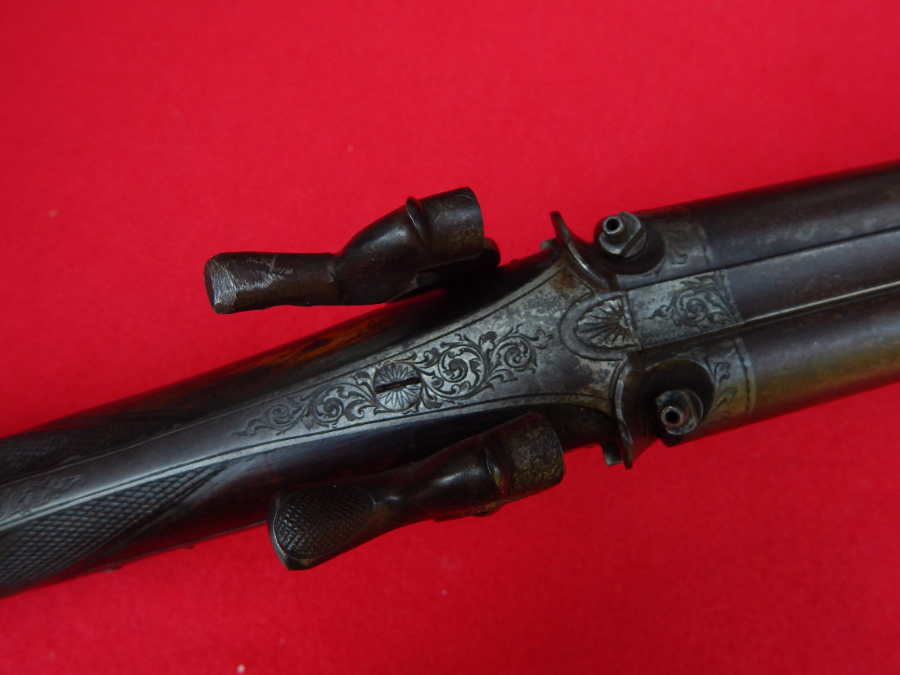


I have seen a lot of these over the years and fired a few rounds thru them over the years. So I can say that that they are a fun if not super accurate revolver.
But they are a good solid pistol for both home defense & a starter pistol for the Rookie. That will not break the bank either.
| Smith & Wesson Model 1899 Military & Police | |
|---|---|

Lend-Lease M&P dating from World War II, missing lanyard ring
|
|
| Type | Service revolver |
| Place of origin | United States |
| Service history | |
| In service | 1899-Present |
| Used by | See Users |
| Wars | World War I Easter Rising Irish War of Independence World War II Korean War Vietnam War Gulf War The Troubles other conflicts |
| Production history | |
| Designed | 1899 |
| Manufacturer | Smith & Wesson |
| Produced | 1899–present |
| Variants | 38 M&P M&P Model 1902 Model of 1905 Victory Model Model 10 |
| Specifications | |
| Weight | ~ 34 oz (907 g) with standard 4″ (102 mm) barrel (unloaded) |
| Barrel length |
|
|
|
|
| Cartridge | .38 Long Colt .38 Special .38/200 (.38 S&W) |
| Action | Double action |
| Muzzle velocity | 1,000 feet per second (300 m/s) (.38 Special) 685 feet per second (209 m/s) (.38/200) |
| Feed system | 6-round cylinder |
| Sights | Blade front sight, notched rear sight |
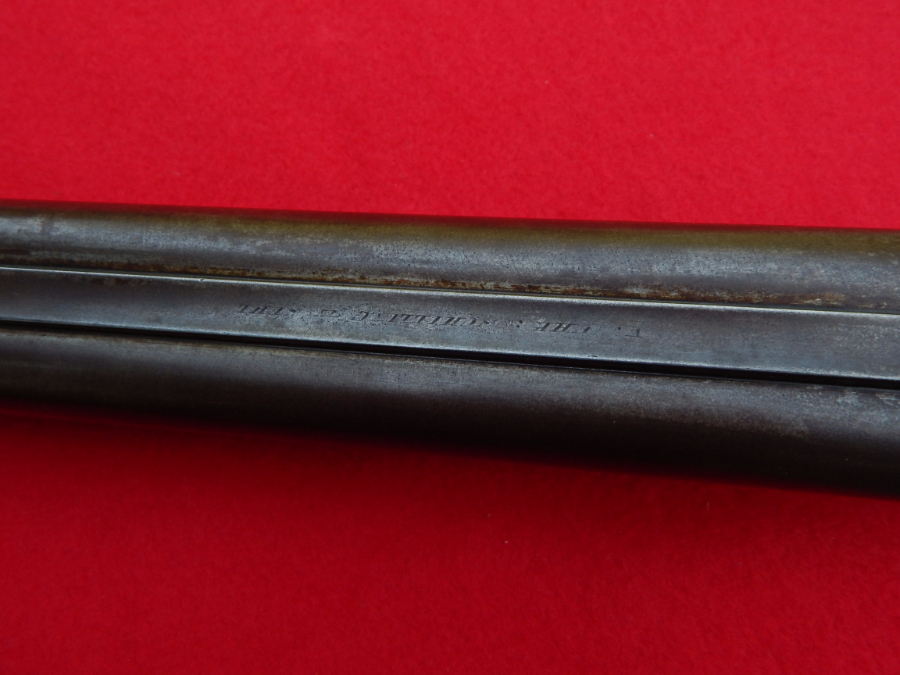
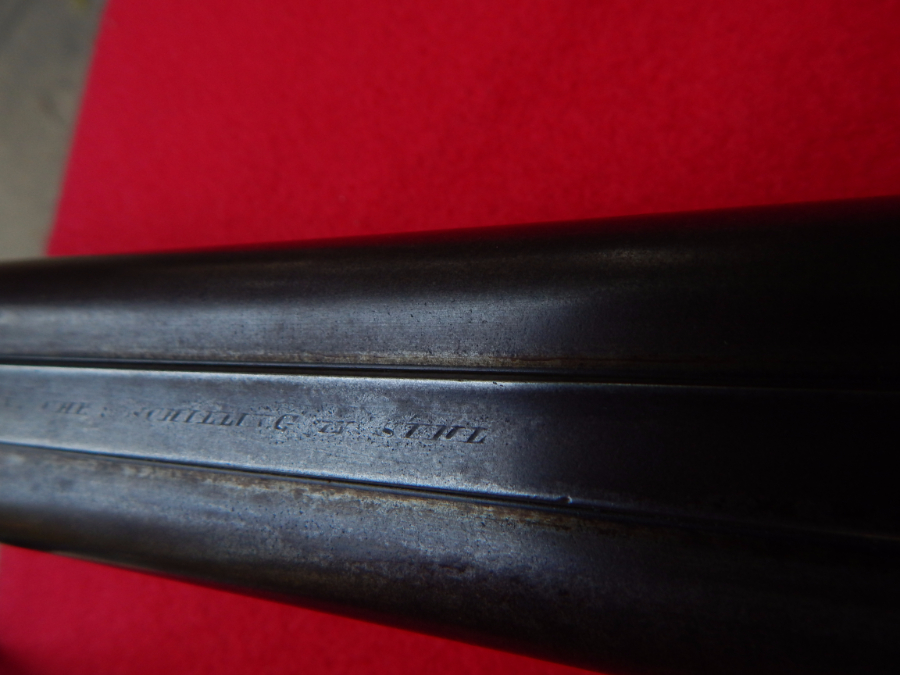
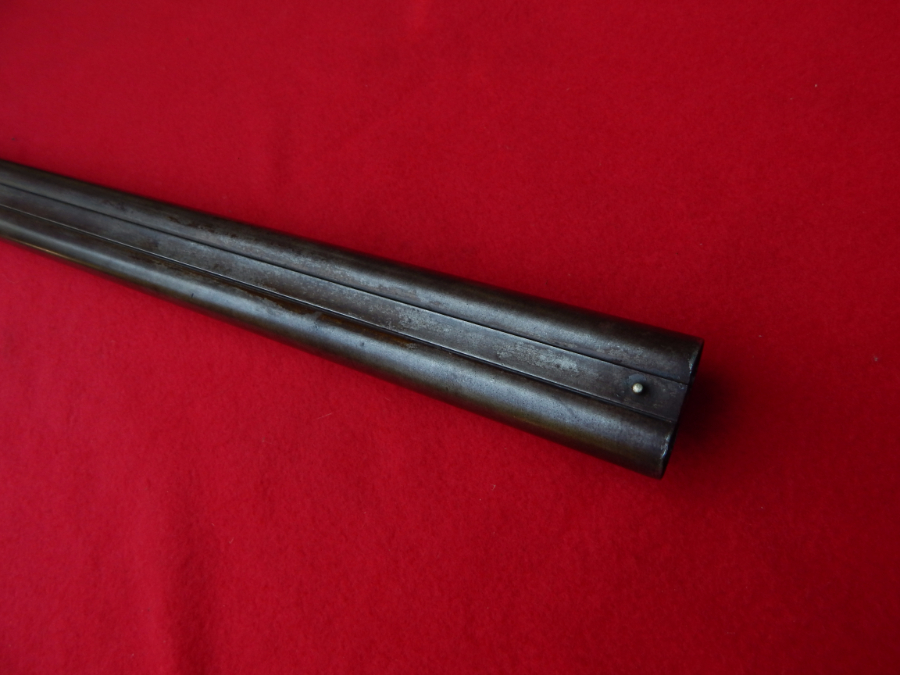
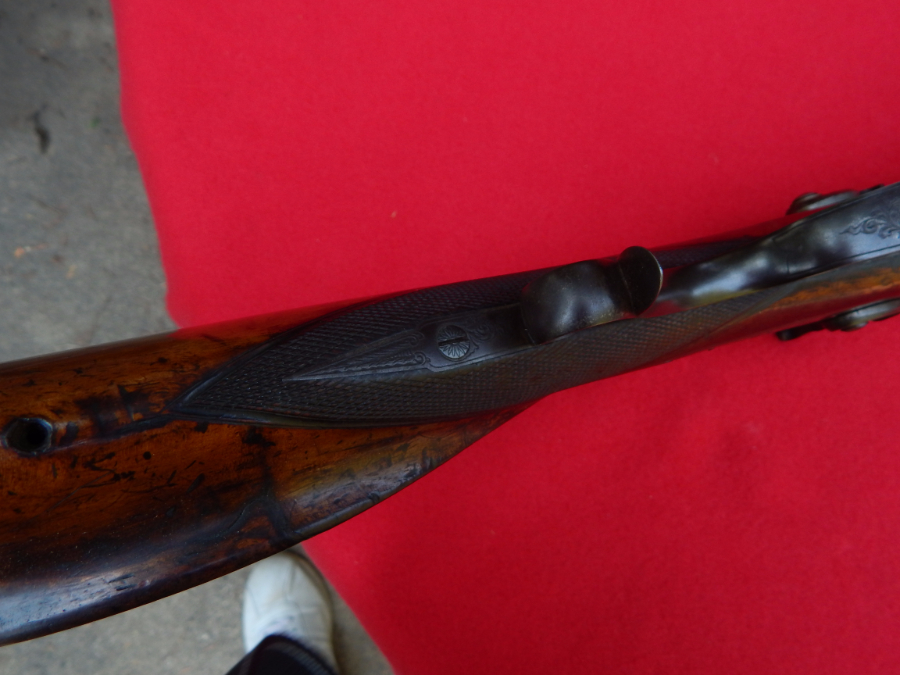
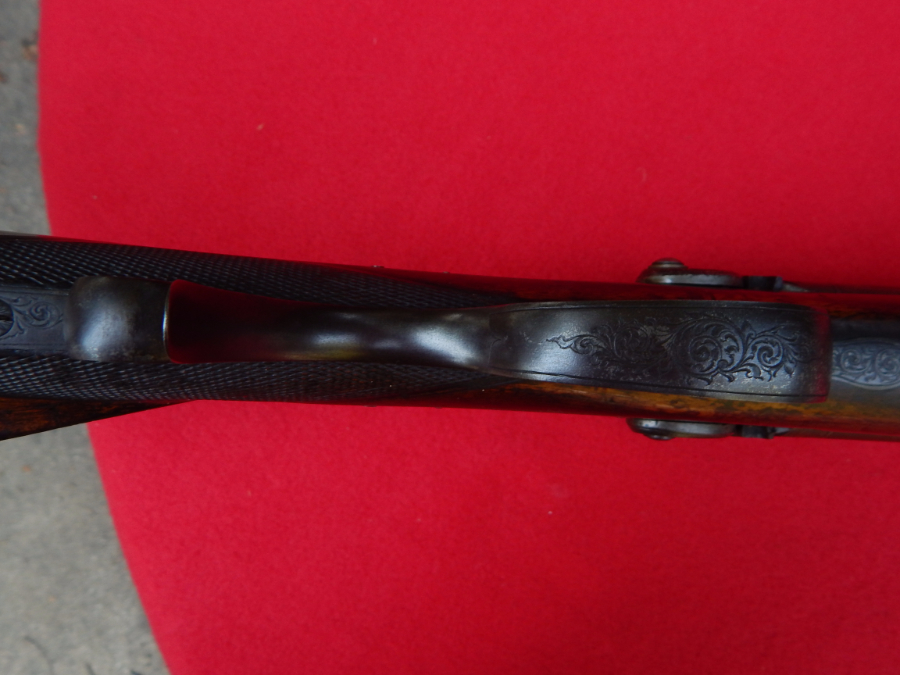
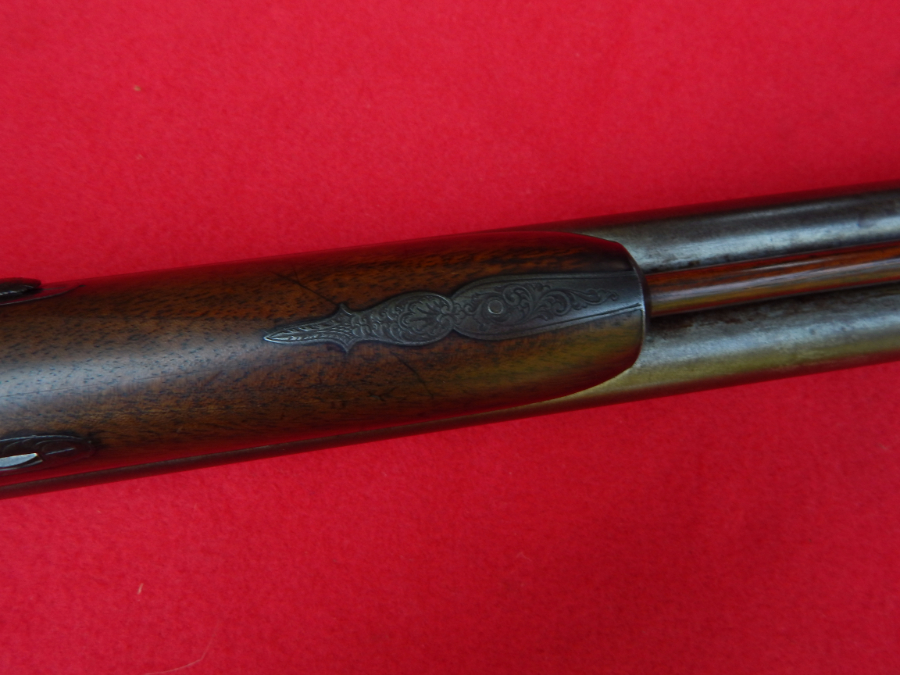
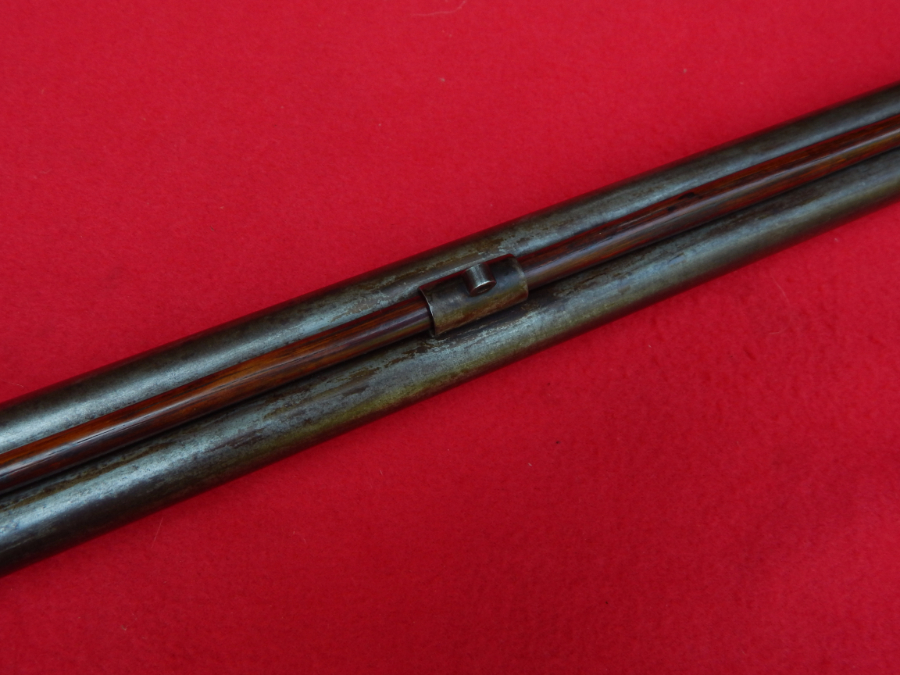
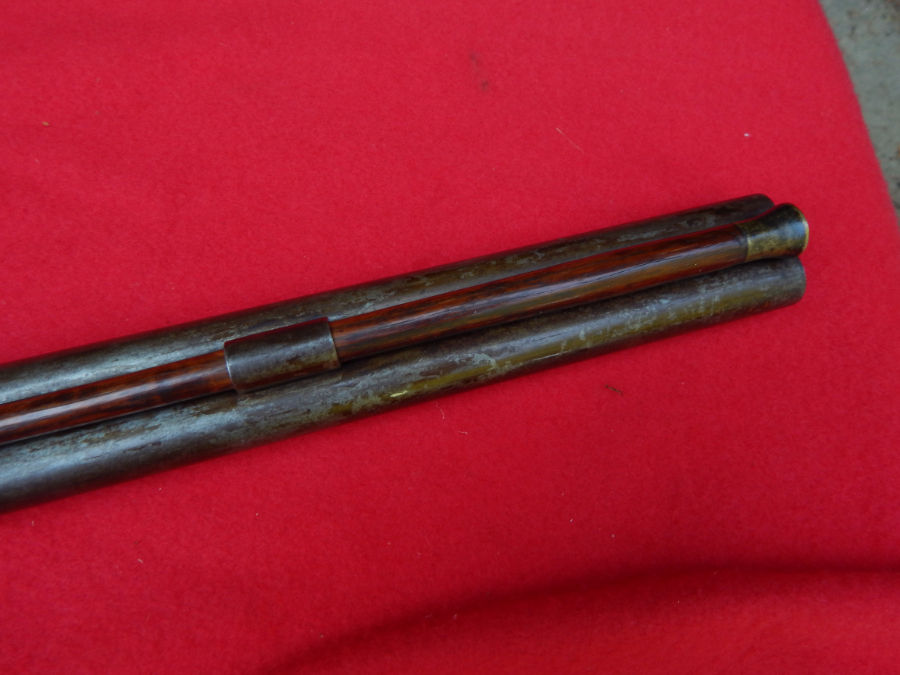
The Smith & Wesson Model 10, previously known as the Smith & Wesson .38 Hand Ejector Model of 1899, the Smith & Wesson Military & Police or the Smith & Wesson Victory Model, is a revolver of worldwide popularity. It was the successor to the Smith & Wesson .32 Hand Ejector Model of 1896 and was the first Smith & Wesson revolver to feature a cylinder release latch on the left side of the frame like the Colt M1889. In production since 1899, it is a six-shot double-action revolver with fixed sights. Over its long production run it has been available with barrel lengths of 2 in (51 mm), 3 in (76 mm), 4 in (100 mm), 5 in (130 mm), and 6 in (150 mm). Barrels of 2.5 inches (64 mm) are also known to have been made for special contracts.[1] Some 6,000,000 of the type have been produced over the years, making it the most popular centerfire revolver of the 20th century.[2]

S&W model 10 snubnose
[hide]
In 1899, the United States Army and Navy placed orders with Smith & Wesson for two to three thousand Model 1899 Hand Ejector revolvers chambered for the M1892 .38 Long Colt U.S. Service Cartridge. With this order, the Hand Ejector Model became known as the .38 Military and Police model.[3] That same year, in response to reports from military sources serving in the Philippines on the relative ineffectiveness of the new cartridge, Smith & Wesson began offering the Military & Police in a new chambering, .38 S&W Special (a.k.a. .38 Special), a slightly elongated version of the .38 Long Colt cartridge with greater bullet weight (158 grains) and powder charge increased from 18 to 21 grains of gunpowder.[3]
In 1902 the .38 Military & Police (2nd Model) was introduced, featuring substantial changes.[1] These included major modification and simplification of the internal lockwork and the addition of a locking underlug on the barrel to engage the previously free-standing ejector rod. Barrel lengths were 4, 5, 6, and 6.5 inches with a rounded butt. Serial numbers for the Military & Police ranged from number 1 in the series to 20,975. Most of the early M&P revolvers chambered in .38 Special appear to have been sold to the civilian market.[3] By 1904, S&W was offering the .38 M&P with a rounded or square butt, and 4-, 5-, and 6.5-inch barrels.
The .38 S&W Military & Police Model of 1905 4th Change, introduced 1915, incorporated a passive hammer block and enlarged service sights that quickly became a standard across the service revolver segment of the industry. Heat treating of cylinders began in 1919.[4]

The 1st Model M&P of 1899, six-inch barrel. The ejector rod is free-standing, without the under-barrel latch of later models

Smith & Wesson 1905 4th change 1915 Target model. “NRA”Slow Fire at 25 yards. This one left the factory in 1929 and was sent with ten others to a firm in Buenos Aires. The hammer was added later and is in the general form of the King Gun Shop modification usually intended for the timed and rapid fire portions of the NRA course.

The lockwork of the first model differed substantially from subsequent versions. The trigger return spring is a flat leaf rather than the coil spring-powered slide used in variations dating from 1905 onwards.

The M&P 1905 Fourth Change variant (1915). The lock mechanism remained principally unchanged after this model.
The S&W Model 10 military revolvers produced from 1942 to 1944 had serial numbers with a “V” prefix, and were known as the Smith & Wesson Victory Model. It is noteworthy that early Victory Models did not always have the V prefix. During World War II over 570,000 of these pistols were supplied to the United Kingdom, Canada, Australia, New Zealand, and South Africa under the Lend-Lease program, chambered in the British .38/200caliber already in use in the Enfield No 2 Mk I Revolverand the Webley Mk IV Revolver. Most Victory Models sent to Britain were fitted with 4-inch or 5-inch barrels, although a few early versions had 6-inch barrels.[5][6]
The Victory Model was used by United States forces during World War II, being chambered in the well-known and popular .38 Special cartridge. The Victory Model was a standard-issue sidearm for United States Navy and Marine Corps aircrews, and was also used by security guards at factories and defense installations throughout the United States during the war.[7]
Some of these revolvers remained in service well into the 1990s with units of the United States Armed Forces, including the Coast Guard. Until the introduction of the Beretta M9 9mm pistol in 1990, U.S. Army helicopter crew members and female military police officers were equipped with .38 caliber Victory Model revolvers. Criminal Investigation Division agents were issued .38 caliber revolvers with two inch barrels. The Victory Model remained in use with Air National Guard tanker and transport crews as late as Operation Desert Storm in 1991.[8]
Some Lend-Lease Victory Model revolvers originally chambered for the British .38/200 were returned to the United States and rechambered to fire the more popular and more powerful .38 Special ammunition, and such revolvers are usually so marked on their barrels. Rechambering of .38-200 cylinders to .38 Special results in oversized chambers, which may cause problems. Lee Harvey Oswald was carrying a re-chambered Victory Model when he was apprehended on November 22, 1963.[9]
The finish on Victory Models was typically a sandblasted and parkerized finish, which is noticeably different from the higher-quality blue or nickel/chrome finishes usually found on commercial M&P/Model 10 revolvers. Other distinguishing features of the Victory Model revolver are the lanyard loop at the bottom of the grip frame, and the use of smooth (rather than checkered) walnut grip panels. However some early models did use a checkered grip, most notably the pre-1942 manufacture.[10]
After World War II, Smith & Wesson returned to manufacturing the M&P series. Along with cosmetic changes and replacement of the frame fitting grip with the Magna stocks, the spring-loaded hammer block safety gave way to a cam-actuated hammer block that rode in a channel in the side plate (Smith 1968). In 1957, Smith & Wesson adopted the convention of using numeric designations to distinguish their various models of handguns, and the M&P was renamed the Model 10.[8]
The M&P/Model 10 has been available in both blued steel finish and nickel finish for most of its production run. The model has also been offered throughout the years with both the round butt and square butt, i.e., grip patterns. Beginning with the Model 10-5 series in the late 1960s, the tapered barrel and its trademark ‘half moon’ front sight (as shown in the illustrations on this page) were replaced by a straight bull barrel and a sloped milled ramp front sight. Late model Model 10s are capable of handling any .38 Special cartridge produced today up to and including +P+ rounds.[8]
As of 2012 the Model 10 was available only in a 4-inch barrel model, as was its stainless steel (Inox) counterpart, the Smith & Wesson Model 64.[11]
As the Model 10 evolved, the following Engineering and Production Changes were made:
After a small prototype run of Model 10-6 revolvers in .357 Magnum caliber, Smith & Wesson introduced the Model 13 heavy barrel in carbon steel and then the Model 65 in stainless steel. Both revolvers featured varying barrel weights and lengths—generally three and four inches with and without underlugs (shrouds). Production dates begin in 1974 for the Model 13 and end upon discontinuation in 1999. The Model 65 was in production from 1972-1999.[1] Both the blued and stainless models were popular with police and FBI, and a variation of the Model 65 was marketed in the Lady Smith line from 1992 to 1999.

Spanish copy of Smith & Wesson’s M & P as used by the Milice and chambered in 8mm French Ordance.
Many of the S & W Military & Police revolvers were captured and used by some of the police forces, such as the Austrian Police, during the occupation after World War II. It is incorrect to refer to them as “the Model 10” as model numbers were not introduced by Smith & Wesson until 1957. Note that, during First World War, copies (slightly undersized) of the Military & Police were produced in Eibar and Guernica (Spain), in 8mm 1892 caliber for the French armies; the Milice man on the right holds such a copy.
The weapon is currently[when?] used by French cash couriers and banks, Disciplined Services of Hong Kong, Myanmar Police Force officers and other Burmese paramilitary units, Peruvian National Police and other police units.
A few copies of Smith & Wesson Model 10 were produced in Israel by Israel Military Industries (IMI) as the Revolver IMI 9mm. The weapon was chambered in the 9mm Luger caliber, instead of .38 Special, the original caliber.[12][13] Also, Norinco of China has manufactured the NP50, which is a copy of the Smith & Wesson Model 64, since 2000.
The S&W Model 10 revolver was a popular weapon before the semi-automatic pistolreplaced the revolver in many police departments, as well as police units and armies.


Now I am sure that some folks got carried away back then. But is what we have in these “progressive” days any better in school & society than back then?
Comments are welcome
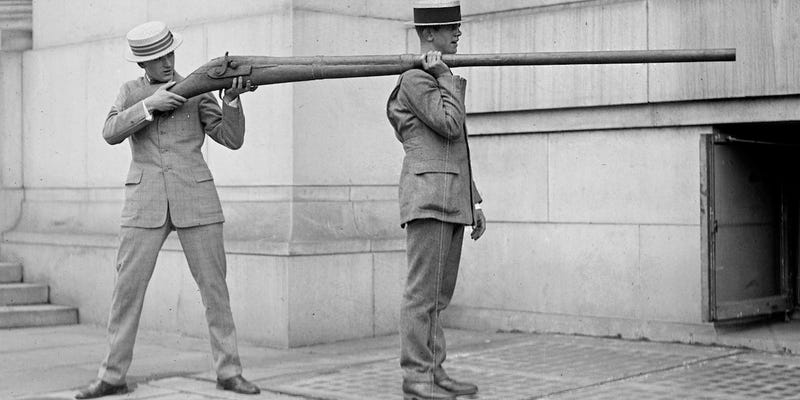
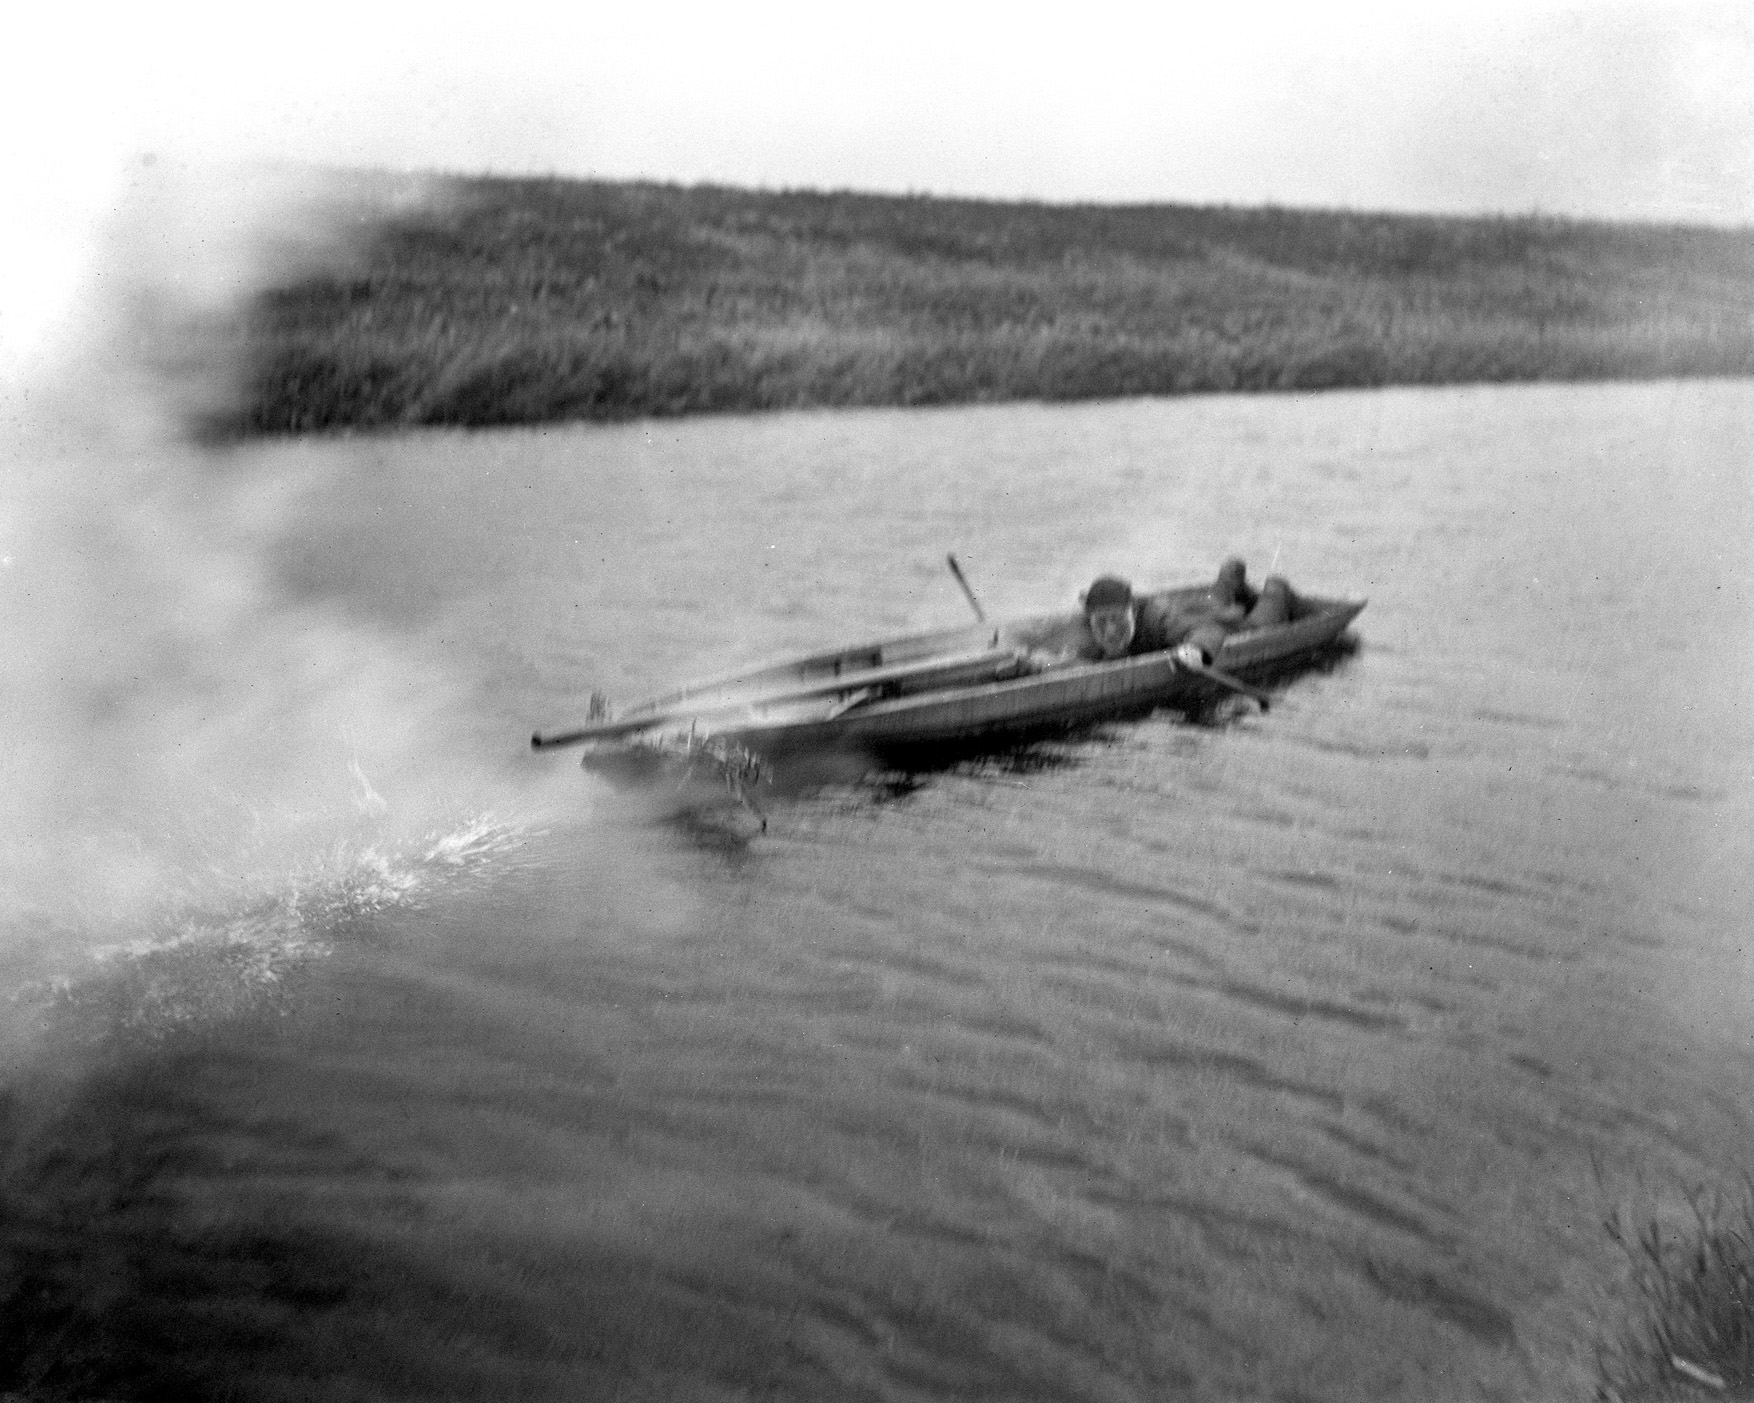


A punt gun is a type of extremely large shotgun used in the 19th and early 20th centuries for shooting large numbers of waterfowl for commercial harvesting operations.

Sighting a punt gun
Punt guns were usually custom-designed and varied widely, but could have bore diameters exceeding 2 inches (51 mm) and fire over a pound (≈ 0.45 kg) of shot at a time.[1]
A single shot could kill over 50 waterfowl resting on the water’s surface.
They were too big to hold and the recoil was so large that they had to be mounted directly on punts used for hunting, hence their name.
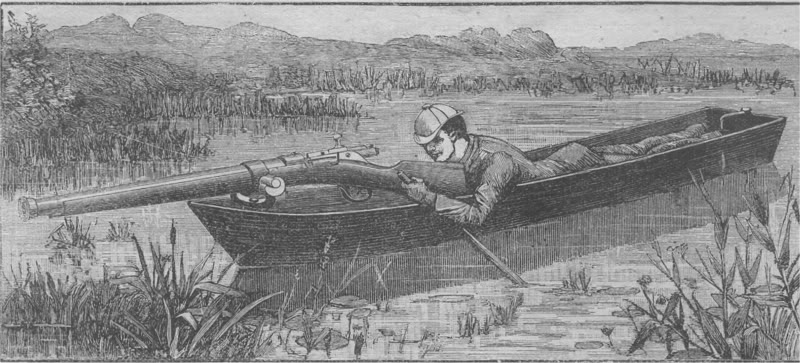
Hunters would manoeuvre their punts quietly into line and range of the flock using poles or oars to avoid startling them. Generally the gun was fixed to the punt; thus the hunter would manoeuvre the entire boat in order to aim the gun.
The guns were sufficiently powerful, and the punts themselves sufficiently small, that firing the gun often propelled the punt backwards several inches or more.
To improve efficiency, hunters could work in fleets of up to around ten punts.

Size comparison of a man and punt gun

In the United States, this practice depleted stocks of wild waterfowl and by the 1860s most states had banned the practice. 
The Lacey Act of 1900 banned the transport of wild game across state lines, and the practice of market hunting was outlawed by a series of federal laws in 1918.
In the United Kingdom, a 1995 survey[which?] showed fewer than 50 active punt guns still in use. UK law limits punt guns to a bore diameter of 1.75 inches (44 mm) (1 1/8 pounder). 
Since Queen Victoria’s Diamond Jubilee in 1897 there has been a punt gun salute every Coronation and Jubilee over Cowbit Wash in Cowbit, Lincolnshire, England.[3]
During the Diamond Jubilee of Elizabeth II, 21 punt gun rounds were fired separately, followed by the guns all being fired simultaneously.[4]
The 2004 film Tremors 4: The Legend Begins featured a punt gun used in combat.
This punt gun was custom-built for the film and was 8 feet 4 inches (2.54 m) long, weighed 94 pounds (43 kg), and had a 2-inch-diameter (51 mm) bore (classified as “A” gauge by the Gun Barrel Proof Act of 1868 in Schedule B).
The weapon was not actually of this bore, instead being a large prop shell concealing a 12 gauge shotgun firing triple-loaded black powder blanks, with the barrel sprayed with WD-40 lubricating oil to produce a large smoke cloud on firing.[5]
In his novel Chesapeake, author James A. Michener details the historical use of punt guns to hunt geese and ducks by the watermen of the Chesapeake Bay.
Desmond Bagley‘s 1973 thriller The Tightrope Men features a percussion-fired punt gun. Although set in northern Finland, punt guns were never used in the country.
In the novel Outer Dark, by Cormac McCarthy, the use of a four-gauge punt gun for hunting ducks is described.
In the Discworld novel Pyramids, mention is made of a “Punt bow”, essentially a combination of this weapon and a crossbow.
All I know is that I want one!
Grumpy

| October 13, 2016
Manly Skills, Survival, Tactical Skills
It’s a common trope in classic Westerns. A posse is rounded up to find some bad guys who’ve headed out into the desert to hide. To help track them down, they bring on an Indian scout. To the astonishment of the cowboys, the native guide can determine how many people are in the bad guy’s gang, how long ago they camped at a particular spot, and that one of the ruffians is injured. It almost seems like magic.
But it’s not.
The scout was simply using a set of keen, field-developed senses, and practicing good forensics.
A few years ago when I did the ITS Tactical Muster, one of my favorite classes at the event was on human tracking, taught by professional combat tracker John Hurth. In just a few short hours, John was able to show us how to know what’s going on with someone on the lam and where he or she is headed simply by looking at their footsteps or noticing a broken branch.
Why would you need to know how to track a human? You’ll probably never have to go on a manhunt for a fugitive, but it’s a handy skill to have nonetheless. Maybe your kid wanders away from your house, or you lose a buddy in a remote wilderness area. Instead of wandering frantically and aimlessly, calling their name, you can know how to search for them effectively and efficiently.
Plus, once you know how to track a human, you can reverse engineer the process as well; that is, you’ll better be able to make your own escape without leaving a trail. You know, just in case you find yourself on an island, being chased by a stalker playing “the most dangerous game.”
Below, we provide a primer on tracking humans. Keep in mind, to really learn how to do this stuff, you need to practice it and practice it for years. But with some dedication, you may eventually reach the level of tracking evinced by the crack trackers in Butch Cassidy and the Sundance Kid, of whom the protagonists repeatedly said with exasperation, “Who are those guys?”
The most important attribute a tracker must develop is his situational awareness. Without it, clues and signs that would lead him to his target go unnoticed.
Situational awareness comes down to two things: 1) observing, and 2) correctly interpreting your observations.
Learning how to become more observant takes time and dedication. It requires changing your mindset, training your memory and senses, and daily practice in truly noticing what you see. Fortunately, we have some fantastic guides on how to do all of those things:
Once you sharpen your powers of observation, you next need to know how to correctly interpret what you see, in order to reach correct conclusions about what’s going on. To do that, you must broaden and deepen your mental models.
Mental models are simply ways of looking at and understanding the world. These paradigms create our expectations for how the world works — helping us grasp what’s happened before, what’s happening now, and what’s likely to happen next.
For a tracker, the mental models he needs to broaden and deepen the most are the ones that will better help him find his target. These fall into two main categories: environment and psychology/habits.
The most obvious subject a tracker needs to know inside and out is the environment in which he is tracking. He needs to understand things like how snow keeps a track changes depending on whether it’s more wet or dry. He needs to know that spiders usually spin their webs late in the evening (if footprints are beneath an unbroken spider web, the tracker can assume that the target passed the point earlier in the day). He needs to know about the fauna and rocks in the area. He needs to know how the wind blows. He needs to know the usual temperature of embers a certain number of hours after a campfire has burned out.
He also needs to know how stuff ages in an environment. A skilled tracker can look at objects or signs in his surroundings and roughly gauge how long ago they were left there by his target. He knows how long it takes for paper to start to brown or a plastic bottle to become discolored after being discarded in a desert or forest. He should be able to look at a broken branch and, based on the color of the exposed wood, roughly guess when it was broken. He even knows what human feces look like 1, 2, 3 days after it was excreted by his target. Developing these mental models will come with practice and time, but one way to build them up before you need them is to make “aging stands.”
Aging Stands: The Tracker’s Experiment
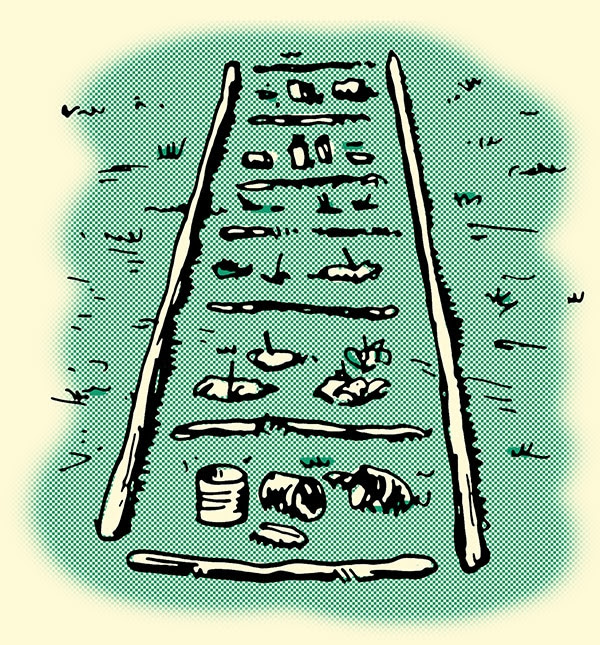
Aging stands are described by expert combat tracker John Hurth as “science experiments” for trackers. You make a one-row grid on the ground out of branches and place different objects into its squares. Ideally, each square will be exposed partly to direct sunlight and partly to areas shaded and protected by trees. In week one, you put items that you want to test in the first square: footprints, paper, broken twigs, water bottles, and yes, even poop. You want to make sure you have duplicate samples in the shaded and unshaded part of the square.
Each day, visit your aging stand and take notes on how things have changed. How have the exposed branches changed color? Has the paper started fading? What’s happened to the poop? Have the impressions of the footprints changed over time?
The next week, move to the next square in the grid and put fresh samples of the same items in it. Compare them to the samples in the first week’s square. Take notes on differences. The next week put new samples in the third square. Compare them to the first and second week’s squares. Over time, you’ll get a rough idea of the aging progression undergone by both natural and manufactured items.
You’ll want to conduct aging stand experiments at different times of the year — spring, summer, fall, and winter — to learn how seasonal variations in humidity, temperature, and precipitation affect the aging process. It’s a laborious exercise, but it’s essential for creating the mental models you need to successfully track someone.
A tracker needs to not only know what’s going on in the environment in which he’s following a target, but what’s going on in the target’s head as well. He needs to develop mental models that deal with human behavior, and this means having a robust knowledge of human psychology and sociology. Knowing the mindset and cultural background of your target can help you know how he’ll act and lead you to where he is. The famous scout Frederick Russell Burnham had this to say about developing these kinds of mental models:
“It is imperative that a scout should know the history, tradition, religion, social customs, and superstitions of whatever country or people he is called on to work in or among. This is almost as necessary as to know the physical character of the country, its climate and products. Certain people will do certain things almost without fail. Certain other things, perfectly feasible, they will not do. There is no danger of knowing too much of the mental habits of an enemy. One should neither underestimate the enemy nor credit him with superhuman powers. Fear and courage are latent in every human being, though roused into activity by very diverse means.”
Besides general cultural and psychological mental models, you need to develop mental models for your particular target. Does he like to eat certain foods? Does he have any medical conditions? Does he smoke or bite his nails? Is he familiar with the outdoors or is he a city dweller? Does he have any particular fears or insecurities? Does he know anyone in the area?
Knowing this sort of information about your target will inform the way you conduct your search and interpret the evidence you find in the field. For example, if you know your target smokes, you’ll be on the lookout for cigarette butts. If he has diabetes, and you come across a puddle of urine that smells fruity, you’ll know you’re on the right track.
Now that you’re working on increasing your situational awareness by becoming more observant and developing appropriate mental models (this is in fact an exercise that should never end), it’s time to start actually tracking.
When you’re out tracking, you’ll be engaging in two visual modes: scan and search.
When you scan the landscape, the goal is to get a general, big-picture overview of your surroundings. Keep an open focus. Don’t have any particular thing you’re looking for, as that will cause “target blindness” and result in your missing other pieces of evidence. Visually sweep the area for possible anomalies in your environment like tracks, litter, blood stains, etc.
Rather than scanning an area haphazardly, tracking experts David Diaz and V. L. McCann recommend dividing it horizontally into thirds:
“Imagine the territory in front of you is a two-dimensional canvas of a painted nature scene. The top boundary is the horizon; the bottom boundary is the ground in front of you. Now divide that canvas into three equal parts: the foreground, the mid-distance, and the far ground…
In order to ‘see’ everything in such a vast area, it must be scanned systematically. With a horizontal movement of your eyes, sweep the foreground from left to right, right to left, and left to right, moving your line of vision up just enough to slightly overlap the area above the last sweep.”
In this way, you methodically work your way up to the far ground and ensure that you don’t miss anything — distant or near — lying before you.
Diaz and McCann describe searching as “in-depth analysis of an area or object.” You can begin searching at any point in the scanning process once you’ve noticed an anomaly. Searching involves looking at the anomaly more closely and recording it in your mind or notebook for later analysis.
Just because you’ve searched one anomaly, doesn’t mean you should stop your scan of the area. Keep scanning and looking for more anomalies that you can more closely examine. As you continue your scan and search, take extra caution to avoid contaminating signs that you’ve uncovered. Leave litter where you found it, and don’t walk on footprints. You want to leave things in their original locations so you can put the pieces together and construct a story based on the evidence found.

As you scan and search, use the light available to you to better locate possible anomalies. For example, in the morning and evening, the sun casts long shadows over impressions in the ground, bringing them into sharper relief. To better see these shadows, position yourself so that the tracks you’re following are between you and the light source. This will require you to change your position in relation to the tracks. Be mindful of not contaminating them with your own prints as you do so.
Tracking at night is possible with the assistance of a light source like a flashlight. You’ll want to use a colored light like green or red to avoid disrupting your night vision. (Side note: red used to be the preferred nighttime light color, but many operators are switching to green because it allows them to see objects more clearly without reducing night vision that much.)

When you’re searching at night, if you look directly at the object you’ve identified, you’ll likely stop seeing it. Looking directly at objects requires you to use the cone area of the retina, and that’s not very active during low-light settings. To make up for this deficiency, you’ll want to use what Diaz and McCann call “off-center vision.” Instead of looking directly at the object you’ve identified, you’ll want to look left, right, above, and below it, pausing at times to verify the properties of the object.
As you scan and search your environment, you want to be on the lookout for a few indicators that will help you track your target. Hurth suggests being on the lookout for the following visual indicators (I haven’t included all of them — check out John’s book for the complete, exhaustive list):
Ground Indicators (on the ground)

Track Traps: The Honey Pot of Ground Indicators
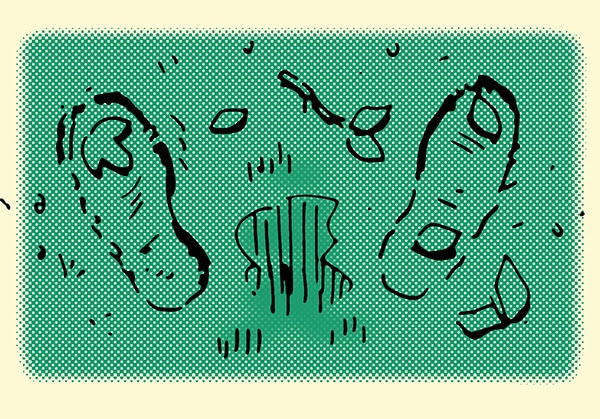
Hurth suggests being on the lookout for “track traps.” These are areas on the ground that do an excellent job of capturing your target’s tracks. He calls them “honey pots” because they leave so much information behind. Mud, sand, soft dirt, and snow are great examples of track traps. Bodies of water or oil spills can be track traps too. A target who steps in water or oil will likely leave footprints on the ground after stepping in the fluid.
Aerial Indicators (above your ankle)

Litter Indicators (objects discarded intentionally or unintentionally)
Blood Indicators
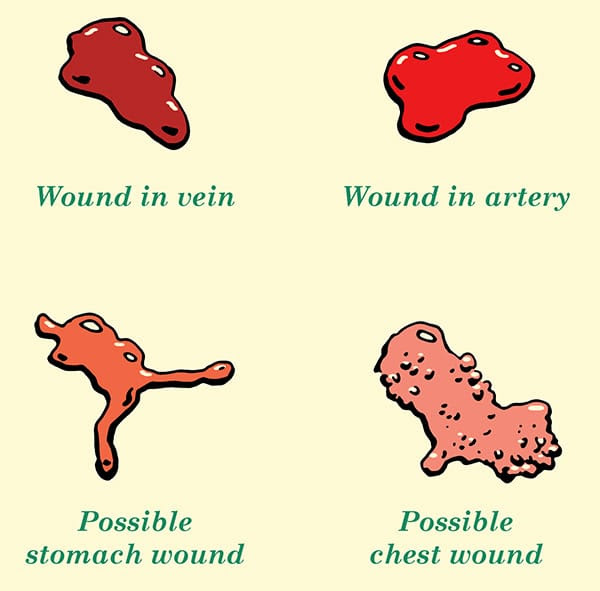
Your target might be injured and consequently leaving blood stains. The color of the blood stain can tell you a lot about the injury he or she has and how long it’s been since they left the blood stain there.
Blood changes color over time as it’s exposed to the elements. Initially, blood spots will be brighter but will eventually fade to a brown or rust color.
Bodily Discharge Indicators
Vomit, poop, pee, snot — these bodily discharges may not be pleasant to contemplate, but they can not only help lead you in the direction of your target, but also paint a picture of his current condition.
Vomit and poop can tell you what sort of food your target’s been eating. If there’s a lot of liquid, clear vomit or you see diarrhea, there’s a chance he could be dehydrated.
If you find a urine spot that has a very fragrant ammonia smell, the target is likely dehydrated. If it has a fruity smell, there’s a chance he’s diabetic.
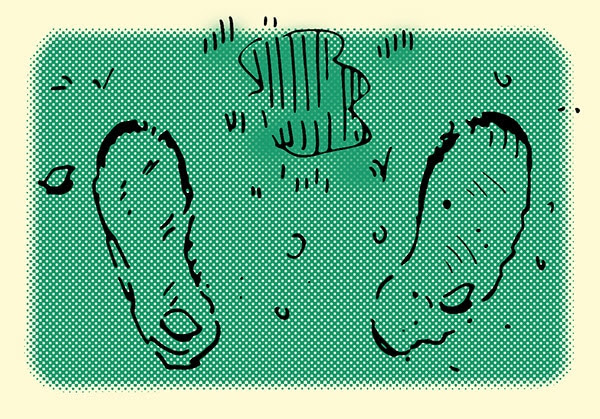
Man peeing
Woman peeing
The relation of a urine stain’s position to a set of footprints can tell you if it came from a man or a woman. If the urine stain is in front of the footprints, probably a dude. If the stain is in the middle of the footprints or near the heels, likely a lady who popped a squat to do her business.
Audio and Olfactory Indicators
As a tracker, you can’t just rely on your sight to track down your target. Sounds — heavy breathing, talking, crying, movement in brush, coughing, etc. — can provide insights as to where your target is.
Smells can also provide useful clues. The smell of smoke can lead you to a campfire where the target is currently or has been recently. If the target’s been without a shower for a couple of days, he might also be giving off some pungent body odor.
Bottom line: as you scan and search with your eyes, don’t take your nose and ears offline. They can provide useful information you’d be missing using sight alone.
While you should be scanning and searching for signs and indicators like blood, trampled grass, and broken cobwebs, footprints will be one of your primary ways of following and tracking your target.
A professional tracker is so adept at tracking footprints that he can identify individuals simply with a glance at the impressions in the ground. They can also immediately tell if the person is running, carrying a load, carrying another person, or even walking backwards.
The ability to create this dossier on a target simply by looking at their footprints requires some careful observation. Here’s what to look for when identifying and interpreting footprints.
A footprint data card is your police sketch of your target’s footprint. (John has a template in his book.) You’ll draw the pattern of the sole of his footwear on the card, determine if it’s a boot, shoe, or sandal, and make measurements that include the length of the print overall, the width of its heel (and its length if it’s a boot), and the width of the ball of the foot. You’ll also note if the impression reveals any manufacturer or sizing labels and if the toe is rounded, square, or pointed. You’ll want to record the time and location you located the print and the direction of travel as well.
Hurth recommends putting a nickname on top of the footprint data card based on its salient characteristics. So if you see a “Vibram” logo in a print, you can call that print “Vibram.”
If the target is barefoot, you’ll want to note whether he has a high arch, regular arch, or is flat-footed. You’ll want to measure the width of the ball of the foot and the heel. Make notes about their toes too — missing digits? Hammer toe?

If you look closely enough at footprints, they can tell you a lot about what your target was doing when he left them.
For example, the spacing and depth of the impressions can tell you about the target’s gait — whether he was running or walking. Impressions that are far apart from each other and deeper in the toe or the heel indicate that the target was running; impressions that are shallower and closer together indicate walking.
If the gait is shorter and the impressions are deeper, the target was likely carrying a load like a backpack. If you see a short gait and deep impressions, along with intermittent additions of another set of prints next to the target’s, you can deduce that he was carrying a person (and occasionally putting them down for breaks).
A set of impressions that have a circular indention to the side indicates that the target is using a walking cane or stick.
If one foot leaves a deeper impression than the other, it likely means the target is favoring that leg and that the other leg is injured.
So as you look at footprints, don’t just stop with the observation phase. Try to put together a story of what your target was doing, as this can help you develop a theory as to what he’s likely to do next.
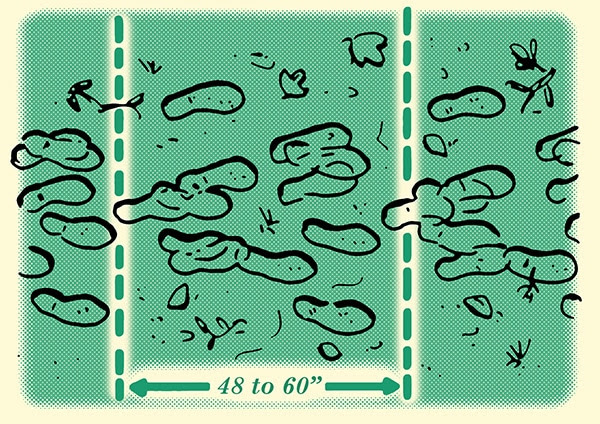
Sometimes counting the number of people in a target group is easy because there are distinct sets of footprints that you can count. But often the footprints overlap and mix together. How do you get a count then?
One way is to use the Box Method to get an estimate. Draw a line behind one print and then measure 48-60 inches forward and draw another line. Count all full and partial prints between those two lines (round up if you end on an odd number). Divide the total print count by two, and you’ll have a rough estimate of the number of people in your target group.
Reading and interpreting footprints is a skill that can be acquired through practice. A great way to do that is to create an artificial track trap out of sand and then have your friends walk through it in different ways while you’re not looking. They can run, limp on one leg, carry each other, walk and then kneel, drag a body, pretend to fight each other, etc.
After they’ve left their tracks, go to the track trap and interpret what they did by looking at the tracks. After you’ve recreated the scenario your friends acted out, use a rake to clear the track trap’s slate and have your buds walk through it again.
I did this exercise with Hurth at the ITS Tactical Muster and had a blast. It’s pretty cool to be able to determine whether a fight went on or if someone was carrying a rifle simply by looking at footprints.
Tracking requires you to be hyper observant of your environment while simultaneously orienting your observations to the mental models in your head. This back and forth observing and orienting allows you to create a story of what’s going on with your target even though you weren’t there to observe them firsthand. By creating this story about your target as you collect evidence, you’ll be in a better position to figure out where they’re headed so you can find them.
